Having a colleague who has bought a geotagging device, and one who is thinking about doing the same, is the best way to get interested too. Asking colleagues how they geotag their imagese, is not quite a success, since they can only tell which programs to use on a W*ndows PC. Since I don’t use crap, I have to search a way to do this on a Mac. My Equipment: an HP iPaq 2490, a tomtom bluetooth GPS receiver, Visual GPSce to record my track in NMEA data and a camera from which the clock is in sync with my PDA…
In this post, I am explaining how to record the data, I assume you have your RAW NMEA data file available.
NMEA or GPX?
Although the NMEA gps data is a standard, not all programs support that format. GPX is the format which is used by most programs and thus recommended. Now how do you convert your raw data to GPX? There is only one program I know with which you can do this, GPS Babel. This is a command line tool and thus not really user friendly for most users but luckily there are enough GUI’s written on top of this tool.
- GPS Visualizer, a website which supports multiple formats
- Houdah GPS, a Mac OS X frontend to GPS Babel.
Houdah GPS
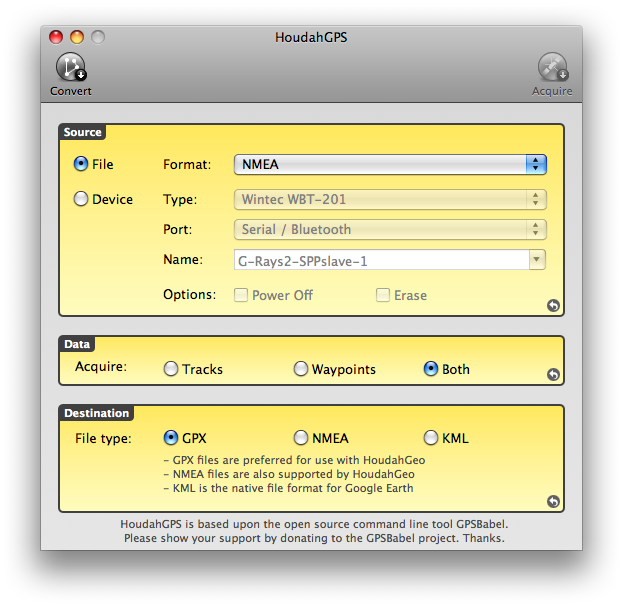
I’m using Houdah GPS because I might not be online while I geotag my photo’s and this way, I don’t have to upload my geo data to the Internet. Using Houdah GPS is quite simple:
- Select your source Because I have an NMEA file available (recorded on my PDA), I select “File” as source and NMEA as format. I had to rename the extension that VisualGPSce has created: the extension is .txt but HoudahGPS only takes .nmea files but an .nmea file is nothing more than a plain text file, thus renaming the .txt to a .nmea file is sufficient.
- Select your data I just leave the default: Both tracks and Waypoints.
- Select your Destination data NMEA is the one we already have, so we don’t have to select that as destination. KML can be used in Google Earth, and as I said before: GPX is a standardized file format, so we’re going to create a GPX file. This can be used in google earth as well, by the way.
- Convert Now that all the preferences are set, click the Convert button in the left upper corner. A File Selection dialog will appear for a first time. Here, you have to select your .nmea file (remember, it’s just the .txt file that you have renamed). Click "Open". A second File Selection dialog will appear in which you can define the name of your gpx file. Choose a name and click "Save"
Geotag
With our gpx file ready, we now have to put the geo data in our photos. There are multiple programs available to do this.
- houdahGEO, from the makers of houdahGPS. This is share ware and costs $25.
- Photo GPS Editor, donnationware.
- GPS Photo Linker, freeware and my favourite.
The two last applications doesn’t seem to be maintained anymore, but they do what they have to do, so right now, I don’t pay attention to that.
GPS Photo Linker

In GPS Photo Linker, click the button "Load Tracks" in the left upper corner and select your GPX file. This may take some time, depending on how many data you have recorded. Next, click "Load Photos" in the upper right corner and select the photos you want to geotag. Not only JPEG is supported, but RAW images are supported as well. When all the images are loaded, go to the Batch tab in the left pane (not Standard or Manual) and click "Batch save to photos". This may take some time too, depending on how many data you have recorded an how many images you have selected.
And that’s basically it. Now your photos are geotagged and Flickr or Picasaweb pin your picture on the earth! But remember: make sure your camera and your recording device have their clocks synced, or else your images won’t be pinned correctly! With GPS Photo Linker, you can shift the time of the photos in order to have them geotagged correctly anyway.